



Problem statement
Nowadays, to provide more convenience for users and to eliminate the need to create and remember multiple accounts to access different systems, website applications have created many useful features for account creation, such as the ability to log in using Google, Facebook, or GitHub accounts, etc. This not only saves users the time of creating a new account and having to remember it every time they want to log into the system.
Furthermore, integrating social networks into the website login system offers several benefits, such as: collecting additional user information like date of birth, place of residence, gender, etc. – information that is often omitted during the account registration process. Combining this with social media-based commenting systems is also very convenient.
- Laravel Socialite integrates Google authentication into websites.
- Application description
First, I will press the Google login button to log in to my account.
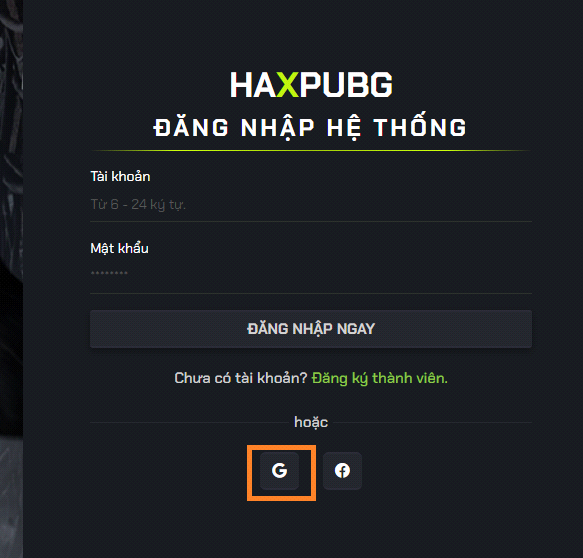
Next, I will choose a Google account to log in to my website.

After logging in, the website will redirect to the homepage and display your username in the menu bar.

- Perform
- Firstly:
- Please access the following address: https://console.cloud.google.com/
Step 1: For first-time users, you need to create a new project by clicking here. CREATE PROJECT:

Step 2: Next, name your project and click CREATE:
Note: For regular accounts, you only need to fill in the first box; you don't need to fill in the two boxes below. 
Step 3: After some time has passed for your project to be created, select the tab. Credentials news Create Credentials news 0Auth client ID.

Step 4: After going to the next page, click on CONFIGURE CONSENT SCREEN 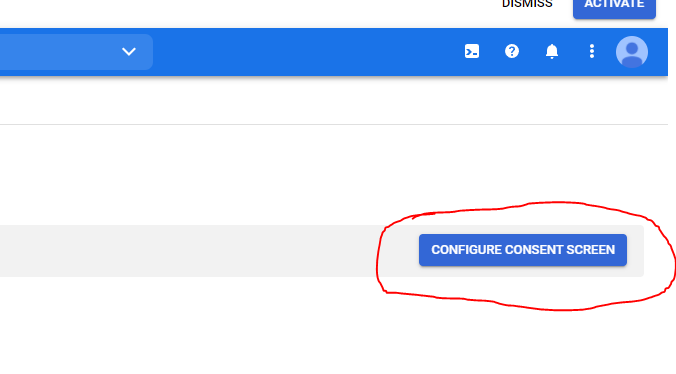
Continue selecting: External > Create

Step 5: On the Edit app registration page, only focus on the information in App Information and Developer contact information and fill in the corresponding fields > Save and Continue
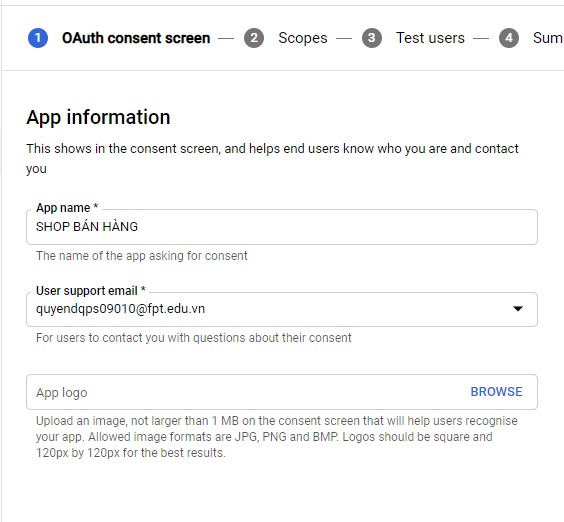

On the page Scopes and Test users If you don't require any permissions or want to add users for testing, just skip this and press Enter. SAVE AND CONTINUE.
After all the above steps are complete, click here. Back to Dashboard.
Step 6: Let's go back. Step 3 A different interface will appear when you press "create 0auth client ID". Here in the section... Application type select Web Application.

After making your selection, the star interface will appear as shown below.
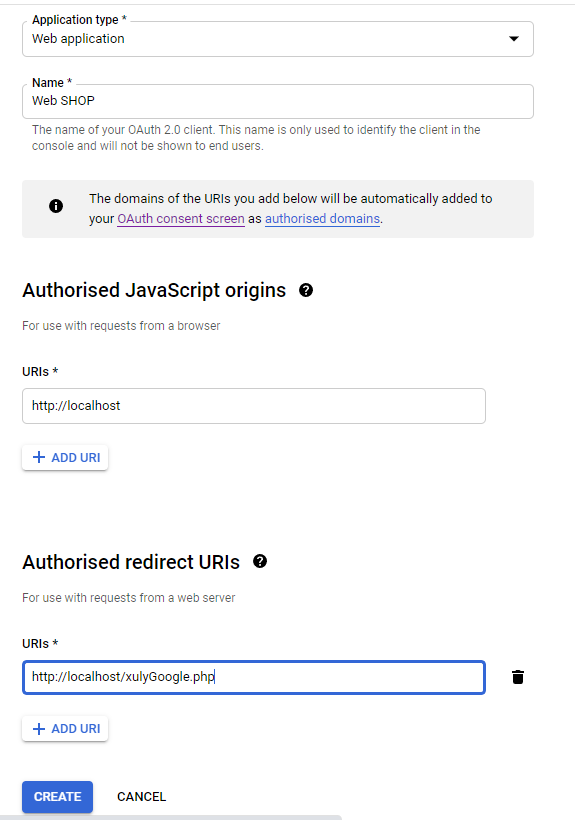
Name: The name you want to give your app.
Authorized JavaScript origins: This is your homepage. (For example: http://localhost/).
Authorized redirect URLs: This is the path to the processing file when receiving data in that format. GET of what Google returns. (for example: http://localhost/xulyGoogle.php ).
Finally, the seal CREATE.

At this point, Google will provide you with two keywords: Your Client ID and Your Client Secret.
Remember to save those two files, okay? ???? And if you forget, you can go to the section Credentials Find your app and click on the pencil icon > in the right corner you will see the two keys above. Let's start coding!.
- Code organization:
- Download the support library:
https://github.com/googleapis/google-api-php-client/releases
(Please select the PHP version you are using. Here, I will be using PHP-7.4).
- Database connection: I'll use PDO to connect to MySQL.
+ Database inheritance connection (Class): Download it here.
+ Connect to database function: Download it here.
Okay, so we have all the tools we need to get started! 😀 Now, open XAMPP and create a project with the structure below.

Index.php: This page leads to your website.
Database.php: This file connects PHP to MySQL to store information in the database.
xulyGoogle.php: The location that receives and processes the information returned by Google has been specified in Google.
Folder:
Login-google: The library supports connecting to Google as described above.
Views: This is where interface files such as header, footer, CSS, JS, etc., are stored.
- Create a Database
You create a table with the following structure: (table name is: TEST)
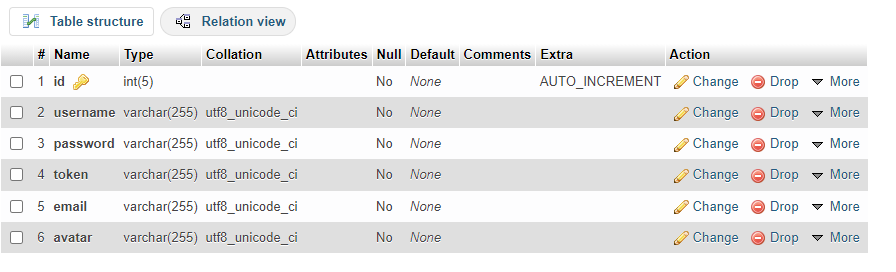
- Connect to the database: my database is ASM
(Please use one of the two connect files above.)
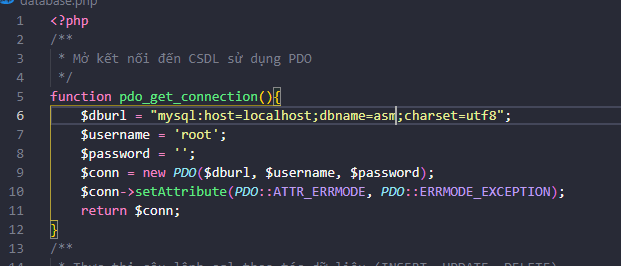
Dbname: Database name
$username: The phpmyadmin account (the default for XAMPP is root)
$password: phpMyAdmin password (Default is empty)
- Index organization:
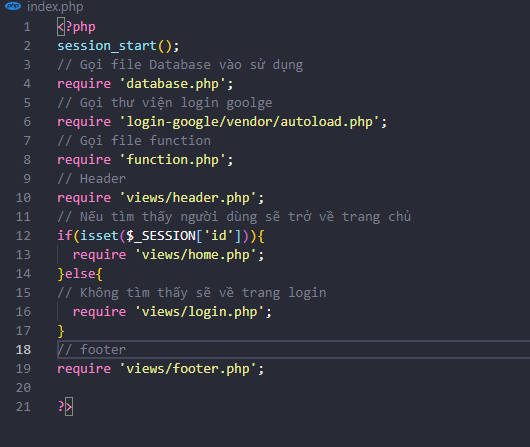
I will call the files as follows:
Header: Top of page
Database: Database connection
Function: Function writing file
Footer: Footer
I will use Sessions to store user information, so I will declare it. session_start() and if found $_SESSION['id'] then it will lead to the page Gate Conversely, I will redirect you to the page. LOGIN.
- Login interface:

Code: Use BOOTSTRAP 5.1

- Write the function:
- Create a function to retrieve client information with Client ID and Client Secret As I mentioned above, please save this. Write it in the function.php file.
Code:
- function clientGoogle(){
- // Get these values from https://console.google.com
- $client_id = ”; // Client ID
- $client_secret = ”; // Client secret
- $redirect_uri = 'http://localhost/xulyGoogle.php'; // URL at Authorized redirect URIs
- $client = new Google Client();
- $client->setClientId($client_id);
- $client->setClientSecret($client_secret);
- $client->setRedirectUri($redirect_uri);
- $client->addScope(“email”);
- $client->addScope(“profile”);
- return $client;
- }
Note: When calling the function file in the index, it must be located below the Google connection library file.

- Create a link to go to the Google login page.
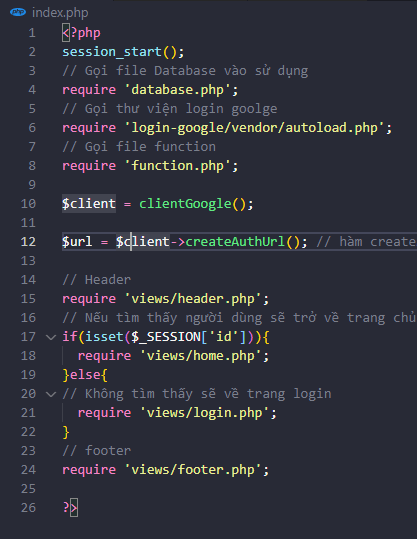
After you have a function, clientGoogle() Let's assign it a variable that's easy to remember and use. Here, I'll assign it the variable $client.
Jaw createAuthUrl() It's already available in the Google login library, so I just need to call that function to get the client information and output the login URL. 😀
Something's wrong. $url You just need to assign it to the href of the Google login button.


- Handling user login:
After logging in using the link you provided, Google will return the following GET data:

At this point, you only need to focus on code variables, or in PHP, these are... $_GET['code']
And you just need to retrieve the variable $_GET['code'] and continue processing it in the file. xulyGoogle.php Okay.
Handle:
Write two functions: one to check user information and one to add a user.
// User verification
function checkThongTin($username,$rule=”){
// If empty, check by username
if($rule == ”){
$sql='SELECT * FROM `test` WHERE `username` = ?';
// Conversely, check by ID
else
$sql='SELECT * FROM `test` WHERE `id` = ?';
}
return pdo_query_one($sql,$username);
}
// Add user
function insertUser($username, $password,$token,$email,$avatar){
$sql='INSERT INTO `test`(`username`,`password`,`token`,`email`,`avatar`)VALUES(?, ?, ?, ?, ?)';
pdo_execute($sql,$username, $password,$token,$email,$avatar);
}
Code file xulyGoogle.php:
<?php
ob_start(); // Fix header redirection error
session_start();
// Call the database file for use
require 'database.php';
// Call the Google login library
require 'login-google/vendor/autoload.php';
// Call the function file
require 'function.php';
client
$client = clientGoogle();
// Create a new variable to retrieve user information
$service = new Google_Service_Oauth2($client);
// Check if there is $_GET['code']. If not, return to login; otherwise, continue processing.
if(isset($_GET['code'])){
// Check if the code is valid
$check = $client->authenticate($_GET['code']);
// The code will be generated on the first request; subsequent requests will fail.
// And the code will generate an array with the keys: error(error code), error_description(error message)
if(isset( $check['error'] )){
echo $check['error_description'];
else
// User information
$user = $service->userinfo->get();
// Retrieve user information
$info = checkThongTin($user->email ); // Get token using getAccessToken function
if(!$info){
If there is no account, add a new account.
$email = $user->email; // var_dump($user) to see
$avatar = $user->picture; // var_dump($user) to see
$password = $user->name; // This password was created for fun, so I'll just assign it to the full name ^^
$token = mt_rand(1000,50000); // getAccessToken function of the library
insertUser($email, $password,$token,$email,$avatar); // Add user here
// SET SESSION['id'] and return to homepage
$_SESSION['id'] = $info['id'];
header('location: /index.php');
else
// If you already have an account, set SESSION['id'] and return to the homepage.
$_SESSION['id'] = $info['id'];
header('location: /index.php');
}
}
else
header('location: /index.php');
}
?>
Do a little more processing on the file. Home.php Almost done ^^
<?php
// Call the function to get information based on the session ID.
$user_info = checkThongTin($_SESSION['id'], 1);
?>
<div>
<h2>
Hello. class='text-success'></strong>
</h2>
<h4>Your email address is: <strong class='text-primary'></strong></h4>
<form action=””>
<a href='logout.php'’ class='btn btn-sm btn-danger'>Logout</a>
</form>
</h2>
</div>
Please create another file. logout.php Just delete the SESSION and you're done ^^:
<?php
session_start(); // Declare the session function for the logout file first
session_destroy(); // function to destroy all sessions on the website
header('location: /index.php');
?>
That's it ^^. Good luck!.
Author: Thy Dao Quoc - Date written: March 22, 2023
Category: Training program, IT - Website Design, IT - Software Applications, Information Technology - Software Applications, TECHNOLOGY AND ENGINEERING SECTOR

0 thoughts on “Tích hợp đăng nhập Google cho website bằng PHP và MySQL”